目录
介绍
- 在spring体系里面、你可以像使用本地配置文件一样使用。
- 用git做版本管理
- 文件名敏感、与目录没关系、当有冲突时取第一个值;
- 不支持A/B、灰度等发布
基本使用
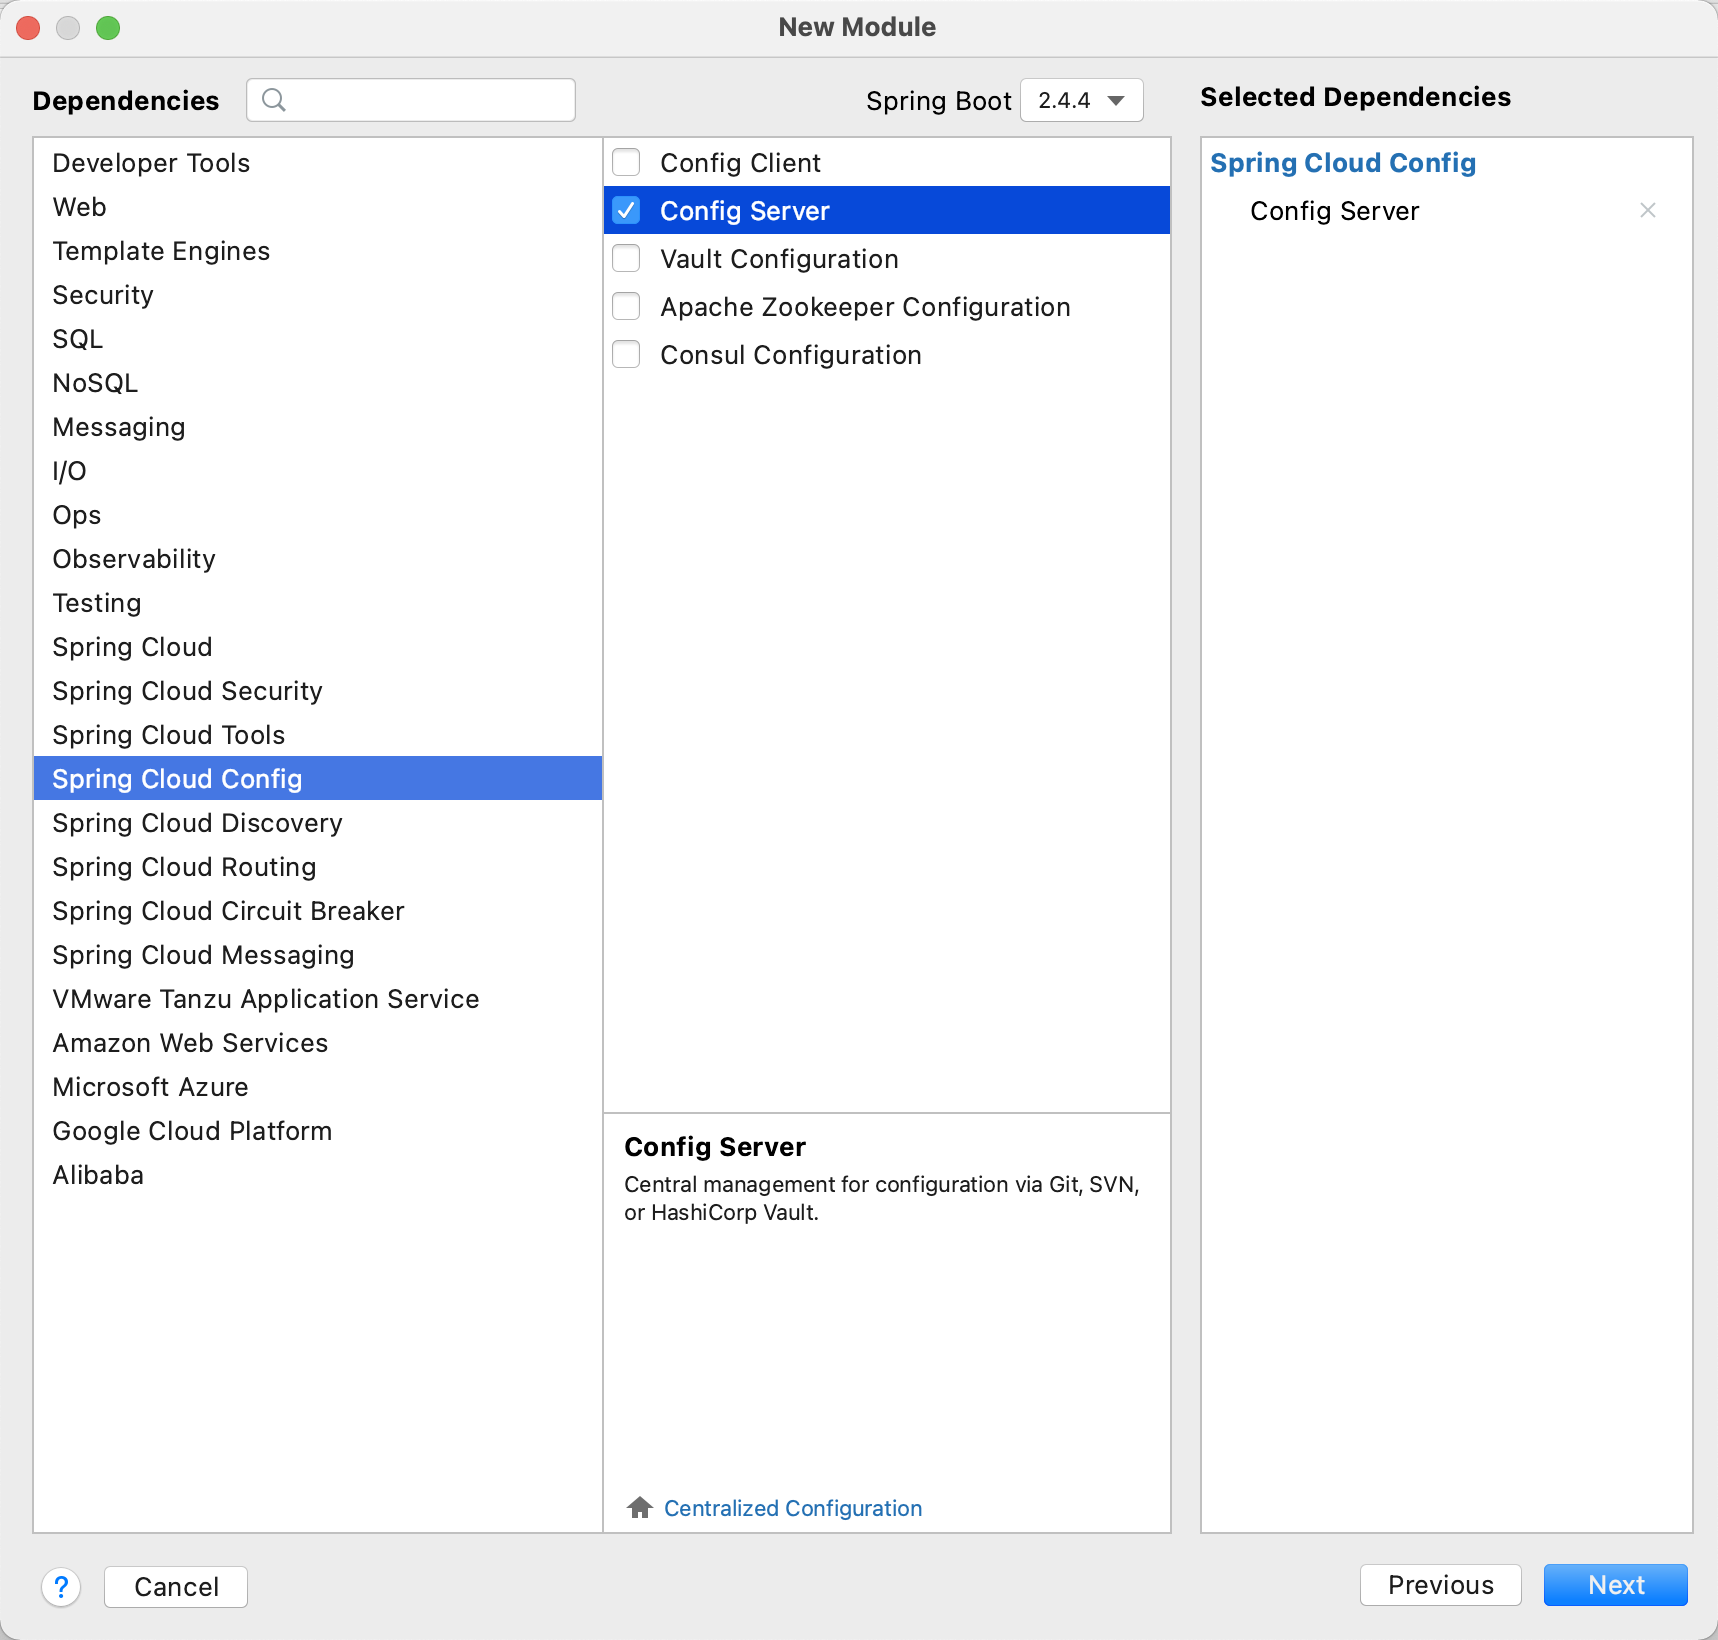
config服务
使用spring Initializer:
![]()
修改application配置文件
![]()
主要属性
spring.cloud.config.server.git.uri
配置文件所在的git仓库
spring.cloud.config.server.git.search-paths
git仓库不止有配置文件还有其他项目时,通过这个属性指定配置文件所在目录,多个目录用逗号分割
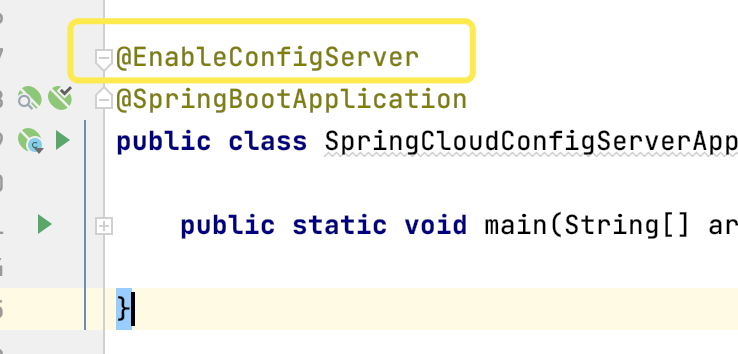
修改启动类
![]()
为启动类增加 @EnableConfigServer注解
client端
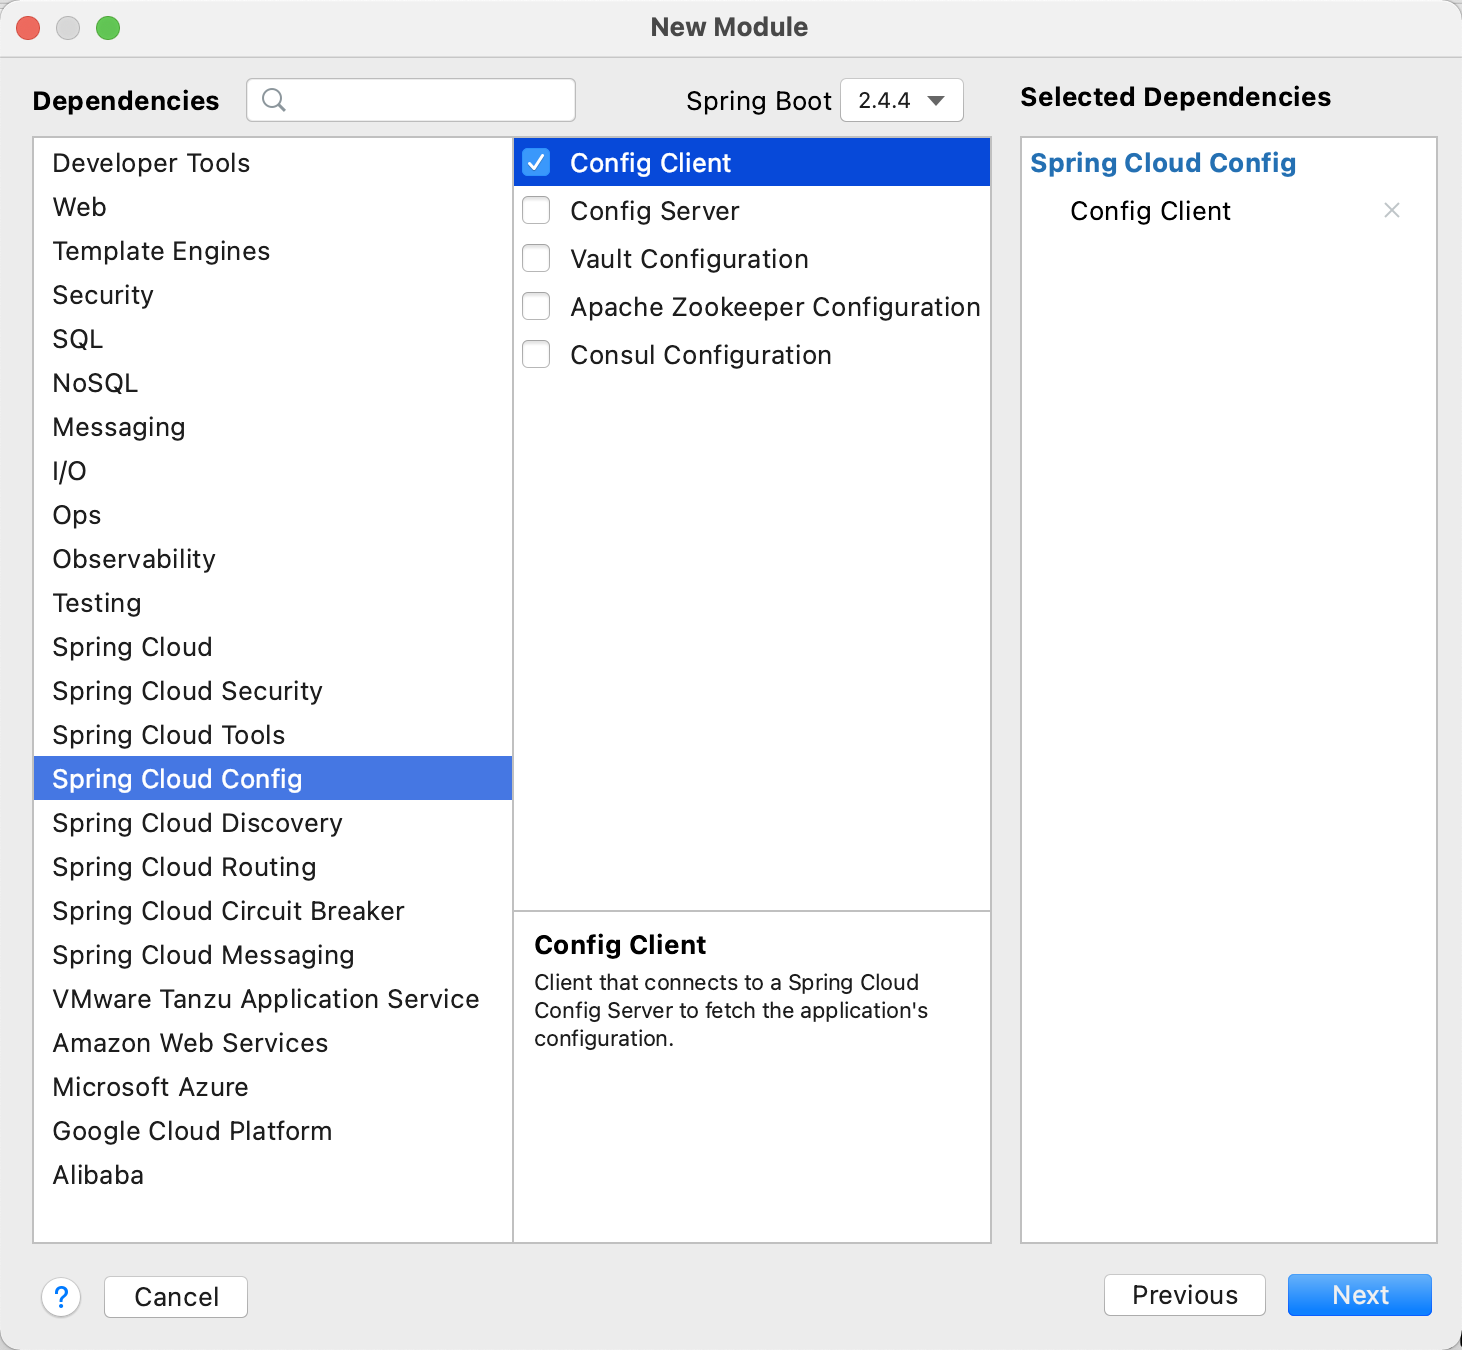
使用Spring Initializr
![]()
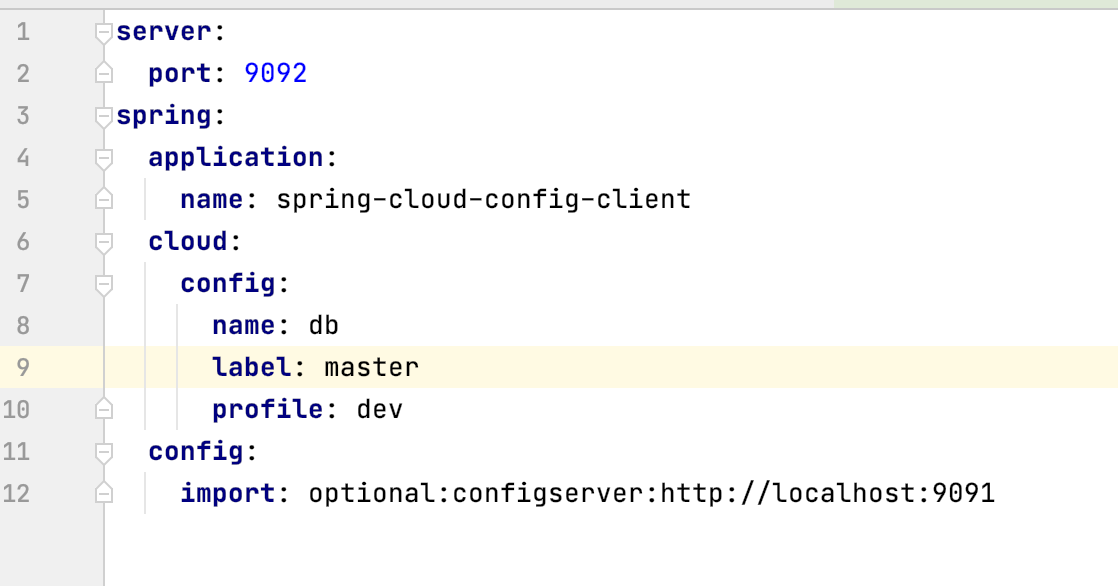
修改配置文件
![]()
主要属性
- spring.cloud.config.name
配置文件名称(db-dev.yml)
- spring.cloud.config.label
git分支
- spring.cloud.config.profile
环境(db-dev.yml)
- spring.config.import
获取配置文件方式:optional:configserver:http://xxx
配置更新
server端
client端
1
| implementation 'org.springframework.boot:spring-boot-starter-actuator'
|
1
| management.endpoints.web.exposure.include: "*"
|
- 用post请求/actuator/refresh 接口
1
| curl -X POST http://localhost:9092/actuator/refresh
|
主意事项
client端要将config配置信息放到bootstrap.yml中
- 适用于 springboot2.4以前的版本
- 原因:配置文件优先级问题、bootstrap文件加载时间早于 application
No Spring.config.import Set
- Springboot2.4.x以后的版本默认不在加载bootstrap文件
- 可以通过系统属性(环境变量) spring.config.bootstrap.enabled=true 启动加载bootstrap
- 建议使用 spring.config.import=optional:configserver:http://xxx属性来设定config信息
actuator刷新接口2.0以后默认不开启
refresh接口2.0 以后默认不开启,需要修改配置文件management.endpoints.web.exposure.include开启;
2.0以前刷新地址是:/refresh,2.0以后:/actuator/refresh
进阶功能
配置文件仓库类型
- git
- 系统文件
- jdbc
- redis
- aws s3
- credhub
- vault
安全
为configServer 添加账号/密码
1
| implementation 'org.springframework.boot:spring-boot-starter-security'
|
1
2
| spring.security.user.name
spring.security.user.password
|
为password加密
1
2
| #只有增加此配置 才可以开启 encrypted功能
encrypt.key=随便一串字符串
|
1
| curl localhost:8888/encrypt -d 12345678
|
1
| spring.security.user.password=”{cipher}加密后的字符串“
|
1
| curl localhost:8888/decrypt -d 加密后的字符串
|
为配置文件加密
1
| curl localhost:8888/encrypt -d 内容
|
1
2
| #配置信息加密时、是否解密后再输出,true-解密、false-不解密直接给客户端
spring.cloud.config.server.encrypt.enabled=true
|
- configServer不协助解密是时客户端配置key
1
2
| #通过此功能可以让客户端负责加解密、最重要的是可以各自采用各自的key增加全局安全性
encrypt.key=随便一串字符串
|
自动更新
- 对server、client 分别添加 bus依赖
1
2
| # 这里使用的是kafka
implementation 'org.springframework.cloud:spring-cloud-starter-bus-kafka'
|
- 修改server、client的application.yml
1
2
3
4
5
6
| spring:
rabbitmq:
host: localhost
port: 9092
username:
password:
|
1
2
3
4
5
6
7
8
9
10
11
12
13
14
| spring5.0以后,以及把spring.security.basic.enabled给去掉了,
所以我们推荐我们去创建一个自己的WebSecurityConfig类去实现WebSecurityConfigAdapter。
@Configuration
@EnableWebSecurity
public class WebSecurityConfig extends WebSecurityConfigurerAdapter {
@Override
protected void configure(HttpSecurity http) throws Exception {
//enable http basic
http.sessionManagement().sessionCreationPolicy(SessionCreationPolicy.NEVER);
http.csrf().disable();
http.authorizeRequests().anyRequest().authenticated().and().httpBasic();
}
}
|